Wednesday, December 21, 2011

Merry Christmas everyone!


I want to wish everyone a blessed Christmas.  I pray the Lord blesses your family and keeps you safe in His care.  May you enjoy the celebration of the birth of our Lord and Savior.
 I am just going to share some pretty pictures with you I have collected over the years.  Consider it my Christmas card to you.

I am so thankful Jesus came to earth and lived and died for me, that I might have life eternal and spend it with Him.


Isn't this just a pretty scene?

I love snowmen!  And pretty birds created by God.

Audrey and Sally want to go caroling this year.  We will take them around to our neighbors and let them sing for them.

Simple times.  That is what we are doing this year.  Simple, thankful, and joyful time celebrating Jesus' birthday.  We have made our gifts and decorated with what we have.  Baking and listening to our Christmas songs.

What a cute snow family!

What a lovely time! Pretty clothes, elegant furnishings and a tree that might burst into flames at any moment!  LOL!  Seriously it all looks so lovely doesn't it?

Can you tell I really like snowmen/families?  : )

Another pretty Christmas scene.

What a festive mailbox!

Merry Christmas from the Swinson family.

Monday, December 5, 2011

Homemade Christmas gift idea

Here it is December already.  This year has just zipped by! The photo on the top of my blog is a shot I took looking off my front porch down the valley this morning.  It was 20 degrees when we got up.  A bit chilly, but the good thing is the sun shines during the day and it is beautiful and dry.

We are doing  homemade gifts for Christmas this year.  I made something today that is really inexpensive to make.  Made from recycled items we probably all have in our homes.  They are fire starters.  They make some nice gifts for those who have fireplaces or wood stoves, or for camp fires or putting in your emergency kit.

The things you need are:
Cardboard egg cartons
Old candles
Dryer lint


I saved my dryer lint for about a week. Depending on how much laundry you do and how much lint comes off each load determines how long you need to save it.
Take the lint and fill each hole of the egg carton. Isn't it amazing the different colors you get from each load?  LOL!

Take your old candles and chop them up a bit and put them in a double boiler over medium heat. The first ones I used were a purple color and then I added this old white pillar candle.  Make sure to remove the wicks from the candles before putting in the pan to melt down.
Here you can see I have a pan inside of another pan.  I put water in the lower pan to keep the wax from getting too hot.  Be very careful while doing this!  DO NOT WALK AWAY WHILE THE WAX IS MELTING!!   It is flammable and will catch on fire easily.  So use extreme caution while working with the melting wax.  As soon as it has melted, turn off the heat.

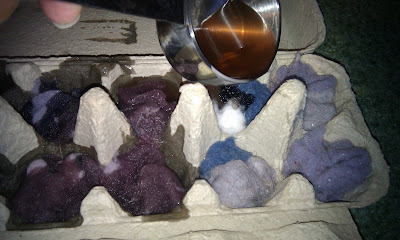
Next pour the melted wax over your lint, filling each cup.  I used a small measuring cup to dip the wax out of the larger pot.  Be very careful not to spill it on yourself.  I put the carton in the freezer for about 15 minutes to set the wax. You can just let it sit out at room temperature and it will harden in time.

After they are hardened up, take some shears and cut apart the cups.  To use them put them on the bottom of your fireplace/wood stove and put your kindling on top just like you would build your fire using other fire starters or paper.  I am putting these in tins for gifts.  Simple, frugal and useful! 

Monday, November 21, 2011

Sewing again!


I finally got to spend some time in my sewing room.  I made this valance for the dining room window. I am making another to match in the kitchen window hopefully before Thanksgiving.  Thanks for the idea from my friend Lisa who showed me a photo of one in a different color that she likes.  I got the idea from it.  Thanks again Lisa for the green check fabric, it worked so well with my green toile print.  : )


Close up


Sunday, November 6, 2011

Cranberry Season

It is cranberry season again on the Southern Oregon coast.  So we went to visit our friends Marci and Dave down near Bandon.  Remember last years post about the cranberry bog?  We love visiting with Marci and Dave.  We took some of our garden produce and apples and traded for buckets of cranberries.  This is such a blessing to us to have fresh cranberries!  We feel so spoiled.  : )

The girls each got to dip cranberries out of the bog into a bucket with a rake.  They thought that was pretty cool.

We also learned something new about cranberries.  Last year we got to pick some cranberries from Marci and Dave's baby bog.  That is where they grow the plants for making a new bog.  This year they planted a new bog.  I had envisioned them hand planting every little vine.  Well Marci told me that Dave mows the dry baby bog.  Then they take the clippings and scatter them on the prepared bog area and then they get tilled in.  The amazing thing is those clippings take root and start new plants.  How cool is that? 

So we came home with three buckets of cranberries.  They need to be cleaned because they have cranberry leaves and other little twigs and grass and such in them.  Anyone ever picked wild huckleberries?  Then you will have an idea of what I am talking about cleaning the berries.

Ed, on the way home comes up with an ingenious plan of how to clean them fast.  I am so blessed to have a husband that God has gifted in figuring out ways to do things easier!  Take a look at the process in the photos below.


Bucket of uncleaned cranberries. See all the leaves and grass?


Ed took half inch square wire and made a ramp.


Then we used the hose to wash the leaves and other debris off the berries.


We slowly let them roll down the wire ramp and picked out any big stuff.


Then they went into a clean tote!
  We only lost about a quart of small berries that fell through the holes.  They didn't go to waste as the chickens loved them!

Here are some of the cleaned berries in the jelly kettle.


Here they have been made into whole cranberry sauce.  Ready for any meal.
 I will post another time about making juice and fruit leather from some of the other berries.

Monday, July 18, 2011

Just popping in to say hi!

I have had computer problems and so have not been able to blog.  I miss it!  I am going to try and update everything.  Lots has been happening here.  We have new kittens, the gardens are all planted again for another year, we have been eating mandarin oranges off our citrus trees, we have a new pool, we are building another pantry, we are back in the upholstery business.  Yep!  Lots happening around here.  I promise to get some posting done and put up the dozens of photos I have been taking to share with all of you.  Thanks for your patience. 

Saturday, June 25, 2011

Farewell to our dear Hercules

Here is Hercules at age 15.  He was attacked by a stray dog and wasn't strong enough to survive surgery.  So we had to put him to sleep.  That was a sad day for us all.  He was a really good cat.  Never got into trouble about anything.  He was always so loving and patient.  We will miss him.

Hercules was born in our home in Alaska.  Our oldest son Jeremy brought home a female stray cat in the middle of winter.  She was pregnant and had 4 kittens.  Jared wanted to keep a kitten and Hercules was the one he chose to keep.  (I had wanted to name him Pierre.)  He had many adventures in Alaska and then made the trip down here to Oregon when we moved in 2004.  He enjoyed another 7 years here.

After taking him to the vet to be put down, we had a funeral and buried him next to our dear Toby.  The vet said he was the equivalent of 112 human years.

Good bye Herc, we will miss you.

Sunday, April 24, 2011

More lambs!

Bountiful Acres has two new lambs.  Lilah gave birth to twin ewe lambs.  One looks like her dad and one looks like her mother.  So we now have two ram lambs and two ewe lambs.  This is what we saw when we went out to the barn the other night.  I was afraid the little brown lamb had something wrong with it.  But she was just tired from being born first!


As you can see she was a big baby!  And she is up and walking around the next morning, along with her little sister who is a black sheep like their mama.


And here is Ginger and her two ram lambs that are now a month and half old.  It is amazing how fast they grow!


And then we have two ducks and three hens setting on eggs.  One hen has crowded into the duck nest box and is sitting on her eggs in front of the duck!  A bit crowded, but neither of them will give up the space.  At least the chicken will be finished  nesting in 21 days and she will leave with her chicks.  That will give the duck the additional time she needs to hatch out her batch.  Muscovy ducks take 35 days to hatch.  We also have a hen in the main chicken house sitting and one of our Dark Cornish hens sitting in their barn.

Yes it is Spring time here.  The trees are in bloom in the orchard.  Now for some sunny weather and no more rain would be really good!

Happy blessed Easter to all!  I am so thankful the Jesus came and made himself flesh and paid for our sins.  That He rose from the grave and now I am forgiven and adopted into the family of God.


Thursday, April 14, 2011

Introducing the Victorian Rose Soap Company!

I would like to introduce my readers to a wonderful new handmade soap company.  It is the Victorian Rose Soap Company.  It has been started by a friend of mine and her daughter.  Mrs. Karen Lossing and her daughter Emmeline.  They have taken their goat milk and are making soap from it.  I have had the pleasure of "testing" many of them.  Let me tell you what luxury these bars of soap bring to the bath and shower.  They smell divine and are so pretty and pleasing to the eye as well.

Emmeline milks the goats that they raise organically on their farm.  They have a soap room where they hand craft the soaps.  Each batch is lovingly made by hand.

There are molded bars, cut bars, and also body butters for sale on their website.  They have really cute children soap in animal shapes and child pleasing scents available also.  And of course unscented soap as well.

To see them and try them for yourself visit the link to the right with their lovely banner on it.  Or just click Here .

Leave a note when you place your order to let Karen know you found her site via my blog.  This helps her know where best to advertise.  :)

Saturday, April 9, 2011

Coming soon!

Coming soon-an interview with a creative lady and her daughter.  They have started a goats milk soap business.  Just wait until you see what they can do! 

Monday, March 28, 2011

Making bread

Here is how I bake roasted garlic and rosemary bread.  It is quite good, even if I do say so myself. 
First we need to roast the garlic.  Take several heads of garlic and slice the top of the cloves off.  I put mine in a baking dish lined with foil.  Leave extra foil hanging over to cover the garlic.

I oiled them with sunflower seed oil.  You can use olive oil too.  I then turned them over.

Seal the foil over the garlic.  Oh I should have told you to preheat your oven to 400 degrees.  Put the garlic in the preheated oven.
Set the timer for 35 minutes.


While we wait for the garlic to roast, pick some fresh rosemary, wash it under running water and pat dry.

Pull the leaves off the stems like in the picture.


Then chop finely.  You don't want big pieces in your bread.
Next I get some hard red wheat from my 5 gallon bucket in the pantry.

Put it in the top of my Nutrimill grinder.

Turn it on and a few minutes later.............
I have freshly ground whole wheat flour!

Now let's go check on that garlic in the oven, shall we?

Ooh, doesn't that look scrumptious?  The aroma  is lovely!

You just gently squeeze the cloves out of their paper shells.

And they are ready to use.

I have assembled my ingredients for the bread.  Sunflower oil, wheat gluten, agave, salt, flour, water and yeast.  And of course we have the roasted garlic and chopped fresh rosemary.

My handy dandy Bosch mixer.  This little jewel makes bread making simple and quick.
Here I have added 6 cups of warm water, 3/4 cup oil, 1/2 cup agave (or honey if you like) 2 heaping tablespoons of salt.

Next I add half the flour (about 7 cups) 1/3 cup wheat gluten, and 4 tablespoons of SAF instant yeast.

Mix on low speed and then gradually add the remaining 7-8 cups of flour.
I add this while the machine in running.  When you hear the motor slow down, turn it up to medium speed.

Set the timer once again for 10 minutes.  After putting the lid on the bowl of course.  But you knew that didn't you?  ;)  You of course can skip the mixer, and do this in a very large bowl.  Mixing and kneading by hand.  If you want to give it a try by hand I would definitely half the recipe.
Make sure you have spotlessly clean counter top.  Then I rub coconut oil on my counter. This prevents the dough from sticking to it.  I take the dough out of the mixer bowl and shape it into a large loaf.

Then I cut it into several balls.


Here is where I have added the roasted garlic and rosemary.  Had I not forgotten to add it to the mixer during the last minute of time, this would not have been necessary.  So I ended up working it in by hand.

One loaf on the far left, is plain without garlic and rosemary.  I used my french bread pan for two of the loaves.  The two little round ones are the girls'.  They always have to shape a small loaf when I bake.

Next I cover them with a flour sack towel and let them rise for about 25 minutes.

While the bread is rising, I wash up my mixer bowl and clean up the counter top.

After baking them for 25 minutes in a 375 degree oven this is how they come out.  Where is the other small loaf you ask?  Well it is at my Mother's house.  I ran out of room in my oven to bake all those loaves.  I always bake a loaf for my parents and this time I took it over unbaked.  Mom popped it into her oven and we both had fresh baked bread.

I rub the bread top with oil after it comes out of the oven.
I know you are wondering why in the world that one loaf resembles a whale with too many blow holes right?  Well I decided to stuff a few more cloves of roasted garlic in that one at the last minute.  I thought for sure it would bake up over the holes.  Nope!  Didn't happen.  That is okay, that whale loaf didn't last long anyway.  All of that bread has been eaten already.  Tomorrow I need to bake another batch of bread.  I will most likely make plain loaves and a couple of pizza crusts.

The next thing I will share with you is making jam.  I made 5 batches of berry jams just before I made this bread last week.  That is part of the reason the bread didn't last long.  Too easy to eat it with homemade jam!

Thanks for tuning in and watching my bread baking day.